As previously mentioned we bought a fixer-upper back in 2009 and had ambitious plans for it. After our initial burst of fixing and painting, life started happening again (as it is wont to do) and we took a 2 year hiatus from actively renovating. But these past two weeks the streak of nothingness was finally broken and we tackled our first big renovation project, the TV room. We moved cables, repainted, removed carpets and finally installed beautiful ‘Rustic Oak’ laminated wood flooring. This is the story of that process. If you want to skip straight ahead to our tips and hints on installing laminated flooring, jump to the bottom of the post. For the rest of you, here is the story of the TV room.
The TV room back in 2009, the green walls and yellowish knotty pine ceiling made it dark and small, despite the amount of space and all the doors that could open. Once we painted the walls white it became a space you could breathe in. It felt lighter, roomier and a lot more livable. The carpet was still in relatively good nick, so we decided to keep it for now and spend most of our time (but not all that much of our money) on overhauling the kitchen. That is a story for another post but here is a hint: if you are only allowed one tool to fix a problem, make sure that tool is a paintbrush :).
We ended up with a lovely space with enough room to entertain plenty people in. Eventually acquired a TV stand and moved the furniture around to make the arrangement a little more practical. A couple of things were still amiss though, that silly light above the TV for one. All the cables, SO MANY of them. Light reflections on the TV screen because of the bamboo blinds. The heat in summer – the room has North- and West-facing sliding doors so it gets sun pretty much all day long. It is wonderful in winter, but between 12 and 4 on a hot summer’s day it becomes unpleasant, wishing-you-had-a-pool-instead-of-front-teeth unpleasant. And that carpet was not dog friendly. We have two big mutts, who are allowed in the house (and sometimes on the bed…) and they are not very conscientious when it comes to cleaning their feet before stepping into the house, so the carpet had to go as well. There is a LONG story in between now and when we actually cleared out the room (Dec 2010), but I won’t bore you with the details of it. I’ll just sum up the main points so that you can learn from our mistakes:
- Creeping commitment is a VERY real thing when it comes to renovation. You just want to hang curtains and before you know it you are replacing the carpet as well.
- If you realise you bit off more than you can chew, get the professionals in. You make money doing your job well, so use that money to pay for people who do their job well. (Thank you Bron, for that nugget of wisdom!)
- Whatever you are budgeting for your project, have at least 30% more in reserves for unexpected eventualities. This is especially true if you have a fixer-upper, you have no idea what lurks beneath the carpet, so to speak.
Fast forward to 2 weeks ago and we are finally getting ready for the last push. We had all the cables: power, HDMI, DSTV, etc. chased into the wall. No more cable problems, yay! (This process and painting the ceiling white finally made us get rid of the carpet. It is a messy business, let me tell you.) The curtains – with blackout lining – are made and ready to be hung. The paint has been bought for the walls and because we learned from our mistakes we got a contractor in to level the floor.

The first coat of paint on the focus wall.
We choose Dulux Exoctic Spice 3 for the focus wall and
Rich Praline 5 for the rest of the room.

A quick peek to see if the curtains and wall colour actually work together… a little late in the game for that, but luckily it does.
Spacer please, fkt.
Installation
So why did the floor need levelling you ask? When we removed the carpet we found large cracks in the cement where the sliding doors were installed. Because the rest of the floor has sunk these cracks had a height difference of about 8 mm. When you install laminate flooring you have to ensure that the difference in floor level is never more than 3 to 5 mm, otherwise your boards will bulge or warp which will ultimately impact the strength and longevity of the floor. If you are like us, still new to renovation and building supplies, I would suggest rather have your floor levelled professionally.
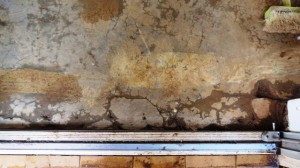
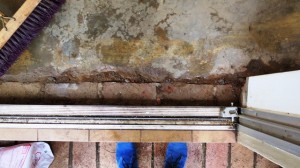
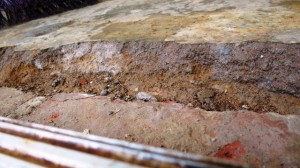
The cracks in the floor, some cement was supported by the foundations while the rest of the floor sank and settled.
Once the floor is level and dry, give it a sweep and another run with the mop to make sure there are no bits and pieces which can damage your laminate boards. Lay out boards along the width and length of your floor to make sure you have enough boards to cover the surface area. Keep in mind that a 8 to 10 mm spacing has to be left between the wall and your floor. This is needed for the skirting and end caps, but also to allow for the boards to expand and contract with temperature fluctuations.
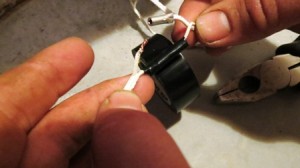
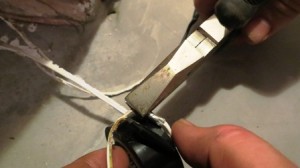
Bron has an acute aversion to exposed wires – we have lost the use of the doorbell and, once, the use of our ADSL line for an entire morning because of his desire to cull anything wire-like. In an old house like this there are plenty wires running all along the ceilings and against walls, so we took the opportunity to at least get the wires in the TV room out of sight. The speaker cables and the cables for the door passives were moved to run along the floor behind the skirting, we got rid of about 10 m of unnecessary cable by doing this. Obviously this meant that some cables had to be cut and joined again, so just a quick step by step on how to do that.
 |
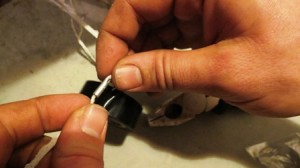 |
| 1) Insert one end of the wire into the crimper and secure it | 2) Insert the other end into the opposite side of the crimp |
 |
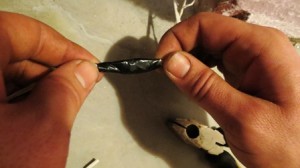 |
| 3) Crimp the other side using pliers | 4) Use insulation tape to prevent shorts |
Secure cables to the wall with a glue gun and hide them behind the skirting.
In the video above you’ll see that we spent a LOT of time trying to get the first three rows in. That is mostly because we did not have proper spacers to keep the gap between the wall and the flooring consistent. So the second most important thing after having your floor properly levelled is to use spacers to get the first couple of rows in. I eventually cut up a cardboard box and rolled pieces of it to make spacers. Once we had those in place we made much better progress. The boards fit into each other at a 20 to 30 degree angle and lock into place with a firm tap from a rubber mallet. We found that fitting a whole row before locking them into place works best. This also allows you to double check and fix any gaps that might be between the boards. And trust me on this, double check it every time. We have a tiny fingernail-width gap in between two of our boards, and every time I look at the floor I notice it. It is not a big thing, but it will bug you so best to check, check and check again before finally tapping the boards into place.
And that is how you install laminate flooring. We are still waiting for our skirting to arrive and as soon as that is in, I’ll post an update on it.
Products used:
- Premia Home 7 mm laminate flooring – Rustic Oak,
- Plascon Double Velvet – White, for the ceiling,
- Dulux Rich Matt – Exotic Spice 3, for the focus wall, and
- Dulux Rich Matt – Rich Praline 5, for the rest of the walls
Professionals used:
- André Stipec – building contractor, levelling floors, plastering, etc.
- Louis Calitz Electrical – all chasing and electrical.
Until next maak’it Monday, happy playing.


1 comment for “Install your own laminate wood flooring”